前言
简单的学习一下web前置知识吧~
PS: 这个章节只是记录一下各个web知识中的较为重要的记忆点,不会对web知识使用的整个流程做分析,并教导如何使用
1. http协议
1.1 RFC 1945(http/1.0)
RFC 1945是定义了 HTTP/1.0 协议的一个文件,全称是 Hypertext Transfer Protocol – HTTP/1.0
这份文件描述了现在常见的网络架构:Server和Client使用http交互的方法。值得一提的是,当前网络中已经有了http1.1 http2 http3等新的协议,有兴趣的小伙伴可以自行查阅,这里为了学习简单,拿http1.0作为学习资料。http 1.0是一种通用的、无状态的、面向对象的应用层协议,这里会简单介绍一下它的作用
1.2 http1.0 请求/回复格式
http1.0的主要交互方式如下:
一个http request: GET / HTTP/1.0
响应的http response: HTTP/1.0 200 OK
一个http request的格式如下:
| Method | SP(space) | Request-URI | SP | HTTP-Version | CRLF(就是’\r\n’) |
|---|---|---|---|---|---|
| Get | 空格 | / | 空格 | HTTP/1.0 | \r\n |
一个http response的格式如下:
| HTTP-Version | SP(space) | Status Code | SP | Reason-Phase | CRLF(就是’\r\n’) |
|---|---|---|---|---|---|
| HTTP/1.0 | 空格 | 200 | 空格 | ok | \r\n |
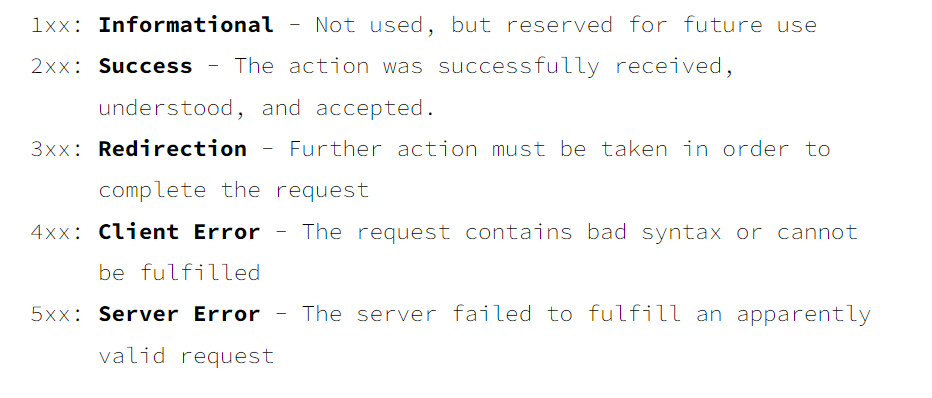
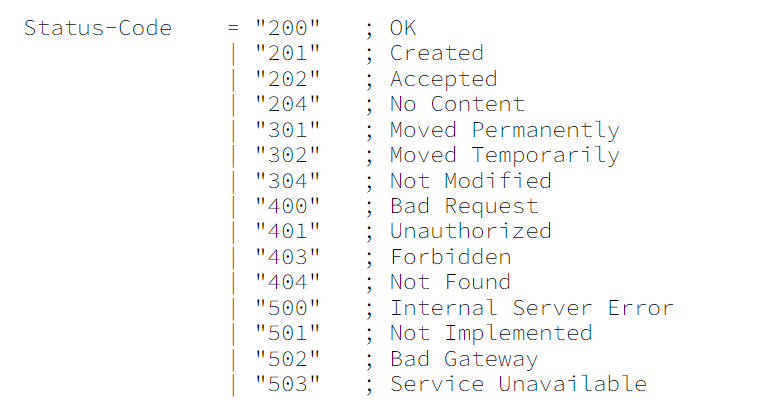
1.3 http1.0 状态码
http在返回响应时,会附加状态码,告诉你响应的信息
1.4 Method
http1.0中有3个请求:GET POST HEAD
其中GET请求用于从服务器获取资源到客户端
POST请求用于将客户端的信息传到服务器
HEAD请求用于本质上和GET一样从服务器获取资源,但是不会真的获取资源,只是获取资源的大小
1.5 HTTP URL Scheme
HTTP URL是发送http请求的目标资源所在的位置标识,其结构如下:
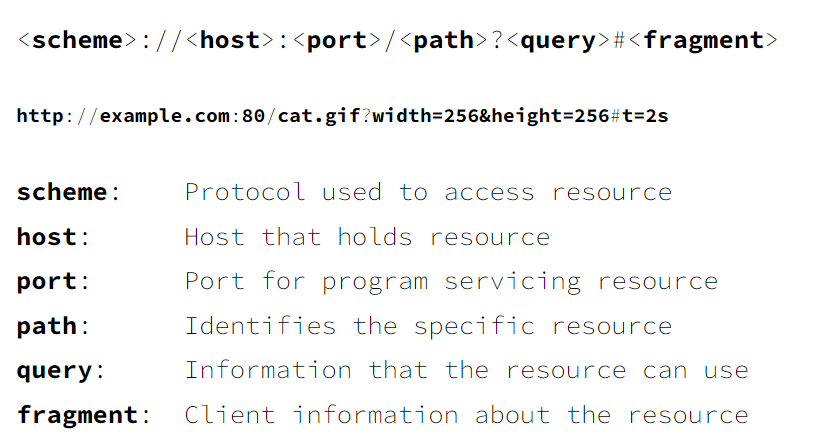 在这个例子中
scheme: http
host: example.com
port: 80
path: cat.gif
query: width=256&height=256
fragment: t=2s
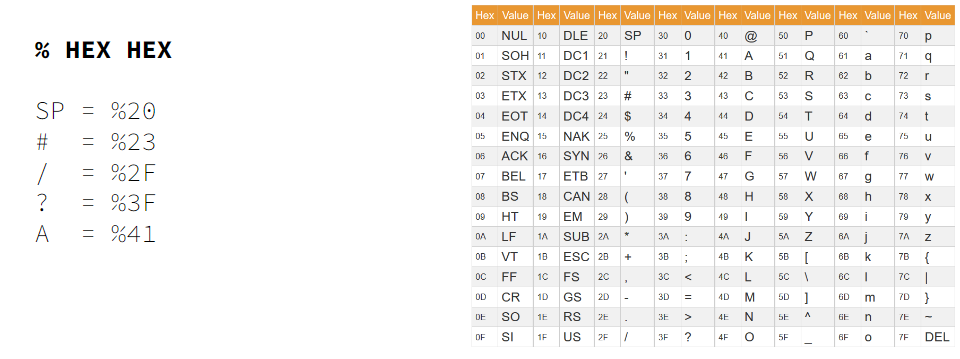
1.6 url encoding
因为输入url访问某个网址是,有些字符无法被打印出来,或者识别时有矛盾之处,一般通过url encoding的方式,即%+hex的形式
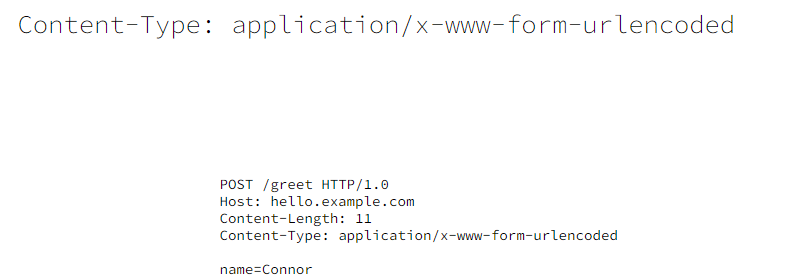
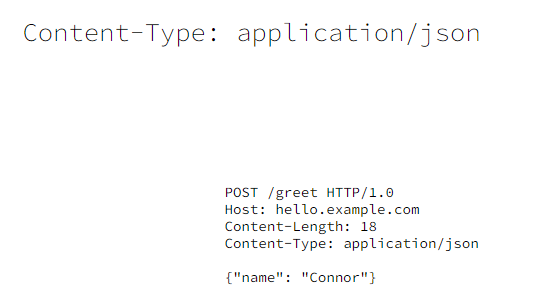
1.7 Content-Type
在发送POST请求时,请求体的格式,常用的有2种x-www-form-urlencoded和JSON
1.8 Cookie
1.1节中提到,http是一种无状态的协议,这意味着什么呢?就是服务器并不了解你先前跟它进行交互了内容->意味着如果你登录了某个网站,但是网站服务器在你登录后就不认你了,约等于白登了,这可怎么办?
解决的办法是在http的header中新增一个属性来维持状态,对于服务端来说,服务端返回一个cookie在http的响应头中: Set-Cookie,客户端拿到这个属性后,在接下来的交互中都在http的请求头中添加: Cookie
比如客户端发送了一个请求,如下:
POST /login HTTP/1.0
Host: account.example.com
Content-Length: 32
Content-Type: application/x-www-form-urlencoded

username=Connor&password=password
服务端收到一个响应,如下:
HTTP/1.0 302 Moved Temporarily
Location: http://account.example.com/
Set-Cookie: authed=Connor
接下来客户端在请求的时候:
GET / HTTP/1.0
Host: account.example.com
Cookie: authed=Connor
服务端收到请求后,返回:
HTTP/1.0 200 OK
Content-Type: text/html; charset=UTF-8
Content-Length: 40
Connection: close

<html><body>Hello, Connor!</body></html>
1.8.1 Session ID
用cookie的时候有一个问题啊,像authed=Connor这样的属性,可以直接被改为authed=admin,导致获得服务端的管理员权限,这并不是好事
Session ID的出现缓解了这个问题:
客户端发送请求时:
POST /login HTTP/1.0
Host: account.example.com
Content-Length: 32
Content-Type: application/x-www-form-urlencoded

username=Connor&password=password
服务端接受请求并返回:
HTTP/1.0 302 Moved Temporarily
Location: http://account.example.com/
Set-Cookie: session_id=A1B2C3D4
至于session_id=A1B2C3D4 标识为 用户Connor这个情报,会存储在服务端的数据库里
接下来的步骤就大差不差了
GET / HTTP/1.0
Host: account.example.com
Cookie: session_id=A1B2C3D4
HTTP/1.0 200 OK
Content-Type: text/html; charset=UTF-8
Content-Length: 40
Connection: close

<html><body>Hello, Connor!</body></html>
2. 常见的请求命令
也介绍一下发送web请求的常见命令有哪些:
2.1 get请求常见方法
curl http://127.0.0.1:80 //向127.0.0.1:80发送http GET请求
curl -H "host: b11ab65a32592f0fd37ba7759a6de76f" http://127.0.0.1:80  //设置http header中的 host值为...
curl 127.0.0.1:80/fc3955bdfea3b9c7dac7d59e34185456 //设置path
curl http://127.0.0.1:80/a7ab7b05%206a9d8202/d92f5dee%20fcd0cf26 //%20为url encoding
curl http://127.0.0.1:80?a=dacd37221eb9ef75e5d50b24f296b17b
curl "http://127.0.0.1:80?a=607d2f069bcb2b86fcea941751f24fe7&b=1665f68d%20e6bbc013%26415f68e5%23a305dda1"

nc 127.0.0.1 80
GET / HTTP/1.0 //进入nc后,输入这条请求,然后回车2次


nc 127.0.0.1 80
GET / HTTP/1.0
host: 100dcacc5ffc67b48792a2b30d7ee143

nc 127.0.0.1 80
GET /aef0ee14a27ef83e38b22b09180a103b HTTP/1.0

nc 127.0.0.1 80
GET /f1dd49e5%206aeed482/d8042f4e%20c2975dad HTTP/1.0

nc 127.0.0.1 80
GET /?a=0837188035ef848ed0806ac863d9fb46 HTTP/1.0

nc 127.0.0.1 80
GET /?a=52f494087c910cc921786b605d7234a8&b=d0c7acd4%20e16da5a2%263e4dc2b2%23634cea49 HTTP/1.0
'''如何发送http get请求并设置格式'''
import requests
# url
url="http://127.0.0.1:80"
path="/b82e99c8%2092e052fc/573c4bf0%20795c1a4b"
query="?a=ac0faf4ebb8e0cd7160b88b2c95fe1c0&b=f4a8c59d%2057d882e5%2619341cea%23758df232"
url = url + path + query

# http header
headers = {
    'host': "c4e345405f816f210563e3e14d3977f3"
}

# send request
response = requests.get(url,headers=headers)

# print result
print(response.status_code)
print(response.text)
2.2 post请求常见方法
curl -X POST -d "a=36bc958a729a642c1e439fa724628477" 127.0.0.1:80
curl -X POST -d "a=952f68a808decdb76c6ff9d06044496e&b=92d2589b%205a1d8061%267dfd0805%256234d00" 127.0.0.1 80
curl -X POST -H "Content-Type: application/json" -d '{"a":"831bef1a7bb83227c0007e07138f3119"}' 127.0.0.1 80 //设置请求头为POST 且设置header中包含json格式, 并发送数据
curl -X POST -H "Content-Type: application/json" -d '{"a":"502882929ae954b6679eb27c2eb3fc0d", "b": {"c": "7f62289d", "d":["e1962678","fca36192 b740bc29&a6b562e7#49bd0dd7"]}}' 127.0.0.1 80   //curl 发送post请求,格式为json,附带很多数据


//cat request.txt
POST / HTTP/1.1
Content-Type: application/x-www-form-urlencoded
Content-Length: 34

a=74b2d8fe7c4063c71f4b4235af364ea6
// shell
cat request.txt | nc 127.0.0.1 80

//cat request.txt
POST / HTTP/1.1
Content-Type: application/x-www-form-urlencoded
Content-Length: 78

a=165333bc6f3693dcd5666114b34a59ff&b=6f604c8d%208fdf70a4%26119c2577%23aff4f336
//shell
cat request.txt | nc 127.0.0.1 80

//cat request.txt
POST / HTTP/1.1
Content-Type: application/json
Content-length: 40

{"a":"7fe0bbfe024a48fe556f3e6b48bf31fa"}
//shell
cat request.txt | nc 127.0.0.1 80

//cat requests.txt
POST / HTTP/1.1
Content-Type: application/json
Content-length: 116

{"a":"1f505e240843ee9354938de975eec33f","b":{"c":"454b9523","d":["68459370","891941a7 7f3127e0&4117cd71#0b00fc7f"]}}
//shell
cat requests.txt | nc 127.0.0.1 80
x-www-form-urlencoded方法。
import requests
# url
url="http://127.0.0.1:80"

# data
data = {"a":"86ee51c2362aa07e4b66c91214b4b603","b":"68c23f54 e8131336&6bea23a9#c051674f"}

# send request
response = requests.post(url,data=data)

# print result
print(response.status_code)
print(response.text)
json格式发送报文:
import requests
# url
url="http://127.0.0.1:80"

#header
headers = {"Content-Type":"application/json"}

# data
data = {"a":"6f0bd5e837421e735dfab604004ea550","b":{"c":"81020930","d":["51f7240a","a709924d 7f163fe0&e51e575d#cf74727d"]}}

# send request
response = requests.post(url,json=data,headers=headers)

# print result
print(response.status_code)
print(response.text)
2.3 redirect
有时候需要你重定向访问某个网址
curl -L 127.0.0.1 80 //-L让curl自动跟随重定向网址

//nc的重定向需要知道重定向路径,随后再nc一次即可
import requests
# url
url="http://127.0.0.1:80"

#header
headers = {"Content-Type":"application/json"}

# data
data = {"a":"6f0bd5e837421e735dfab604004ea550","b":{"c":"81020930","d":["51f7240a","a709924d 7f163fe0&e51e575d#cf74727d"]}}

# send request
response = requests.post(url,json=data,headers=headers,allow_redirects=True)

# print result
print(response.status_code)
print(response.text)
2.4 cookie
如何用之前提到的命令带上cookie呢?
// -L自动追踪重定向, -c 将服务器的cookie保存在cookie.txt中,-b会在每次访问时自动代入cookie.txt
curl -L -c cookie.txt -b cookie.txt 127.0.0.1:80


//cat request.txt
POST / HTTP/1.1
Cookie: cookie=6b2bd093f4b0c05e75fa321ebaf4eed9
Content-Type: application/json
Content-length: 116

{"a":"1f505e240843ee9354938de975eec33f","b":{"c":"454b9523","d":["68459370","891941a7 7f3127e0&4117cd71#0b00fc7f"]}}
// 需要注意的点在于, nc不能像curl那样一手包办,需要先访问一次获得cookie,再把cookie带上
cat request.txt | nc 127.0.0.1 80
python 就很简单了,自动带cookie。
import requests
# url
url="http://127.0.0.1:80"

#header
headers = {"Content-Type":"application/json"}

# data
data = {"a":"6f0bd5e837421e735dfab604004ea550","b":{"c":"81020930","d":["51f7240a","a709924d 7f163fe0&e51e575d#cf74727d"]}}

# send request
response = requests.post(url,json=data,headers=headers,allow_redirects=True)

# print result
print(response.status_code)
print(response.text)